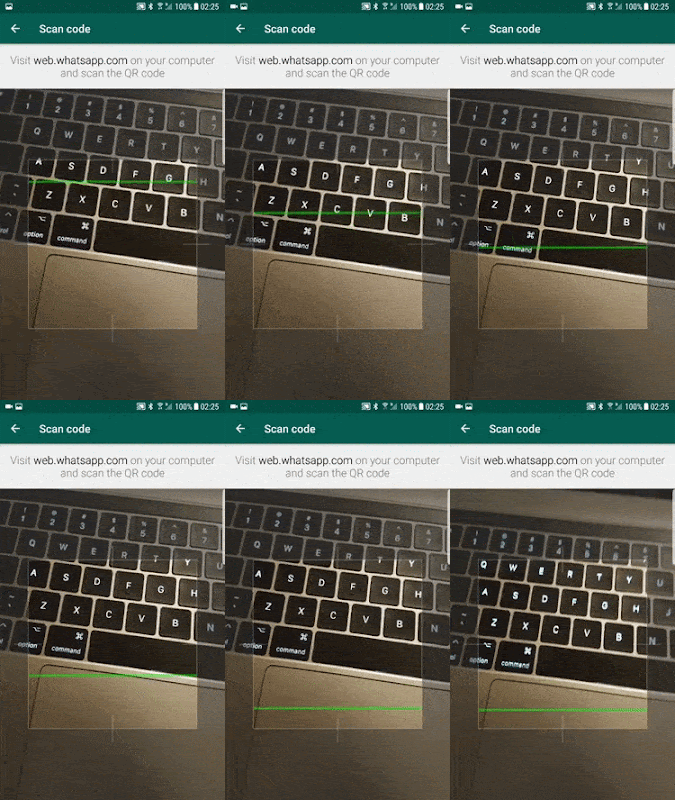
I bet you love that QR scanner screen from WhatsApp and have wondered how it can be achieved in your project. I like the WhatsApp web scanner and decided to implement a similar screen in a project I am presently working on. It is easy and can be done in few minutes. Here's how to achieve it. :)
The Idea Behind
To start with, the idea is having an overlay on a SurfaceView. SurfaceView is what you use to display the camera layer in Android. The view-group atop the surface view must position its semitransparent views atop the surface view such that, you have a center portion fully transparent; after achieving this, you are to fit a view within this empty space and animate it.Lets' Dive In:
First, create you activity XML; you need a FrameLayout, as it allows overlaying layout above each other, your base layer should be the camera preview layer (SurfaceView) and fit above it, a linear layout partitioned into 3 parts, top transparent, bottom transparent and middle view filling up remaining space;
ic_viewfinder.xml
As seen in the XML above, we made the root layout to be a FrameLayout, this enables us to stack views atop one another easily. We then place a surface as the base view, which would display the camera preview; After this, we place a Linear-Layout; and positioned 3 views vertically. The top and bottom views both have a semi-transparent background (e.g #9A000000). The middle layer is a Relative-Layout.
After that, we place a semi-transparent view to the left of the view, and another to the right of the view with heights equalling that of their immediate parent view. This way you don't have an overlap of transparencies thereby accidentally forming a dark "checkerboard".
The middle view is placed in the middle by using relative layouts: centerInParent, leftOf, rightOf properties, to enable it to stretch to occupy the space. (In actual sense you can implement all of these with Linear-Layout but nested weight is really bad for performance).
After this; you'll need a viewfinder image similar to the one shown below:
you can get a decent viewfinder from thenounproject.com. The one used in the sample was from Aurélien Lemesre. If you get from thenounproject, you can remove the attribution and resize it to fit the canvas using any program of your choice. In this project we used a SVG format and converted it to a vector drawable using Android Studio's "Vector Asset Studio" you may use a PNG image.Our vector drawable used in this sample project is shown below, this was converted using Android Studio's "Vector Asset Studio".
ic_viewfinder.xml
Remember to add "VectorDrawables.useSupportLibrary = true" in the "defaultconfig" section of your app's gradle file to support older O.Ss.
At this point, our screen would look like this:
After this, we need to animate the included blue bar from our layout, manifest. We do this by using an ObjectAnimator. We need to perform a translation on the y-axis for the thin blue-bar and make sure it is kept within our viewfinder logo.
MainActivity.java (onCreate section)
As seen above, we keep a handle on the viewfinder's layout (scannerLayout) and also another reference to the thin blue coloured bar which we intend to animate. Now we need to animate it within the bounds of scannerLayout by translating it from the top of scannerLayout to the bottom of the layer, keeping it within the bar.
But we cannot determine the size of scannerLayout until the view has been drawn, in order to achieve this; we will need to latch onto the "ViewTreeObserver" in order to be notified about when the views have been drawn. For this, we subscribed for "GlobalLayoutListener" and perform the initialization in the onGlobalLayout. Finally, we initialize the object animator and pass our animation type and bound to it using the static method ofFloat (of ObjectAnimator) and set the repeat mode to reverse; which allows the bar to go back up after it finishes its trip, and we also set repeat count to infinite.
After all these, our app will look like the screenshot below:
At this point, our overlay is now done, what is left is to enable the camera, implement Barcode scanning functionality and request for permission. Right here!!! we are done with first steps. The next steps will be released in a part two link soon.
You can grab the full source code of the app from here on GitHub.
END OF PART 1
You can grab full source code of Part1 here on github: https://github.com/kunmi/BlogTutorials/tree/master/CameraAnimatedQRScannerViewFinder/Part1


thnx!!
ReplyDeleteCool stuff. Where can we get part 2.
ReplyDelete: -> enable the camera, implement Barcode scanning functionality and request for permission